Tuesday 31 January 2017

Where has The Cake Novice been?!

Sorry everyone, it appears that the extensive coverage of the 2014 wedding cake simply broke me and I forgot how to blog. In the meantime, here's a selection of what I've been up to...


Yes, that's 3 years' worth of little boys birthday cakes!

I had a go at making my own stencil and painted this using edible colour powder mixed with rejuvenator spirit.

Black forest gateaux - Mr Cake Novice's favourite

Motorbike cake April 2014. I bought a specially shaped tin for this and only used it the once!

To build Hulk's face I printed off a picture and used it as a guide to cut out the individual segments. I painted in the darker lines with black colouring.

This is The Luggage from Terry Pratchett's Discworld series.

This was my first use of a rice paper topper.

I wasn't happy with this one, for some reason I couldn't get it smooth and the writing (done with a brush and powder/spirit mix again) wasn't centred or level.


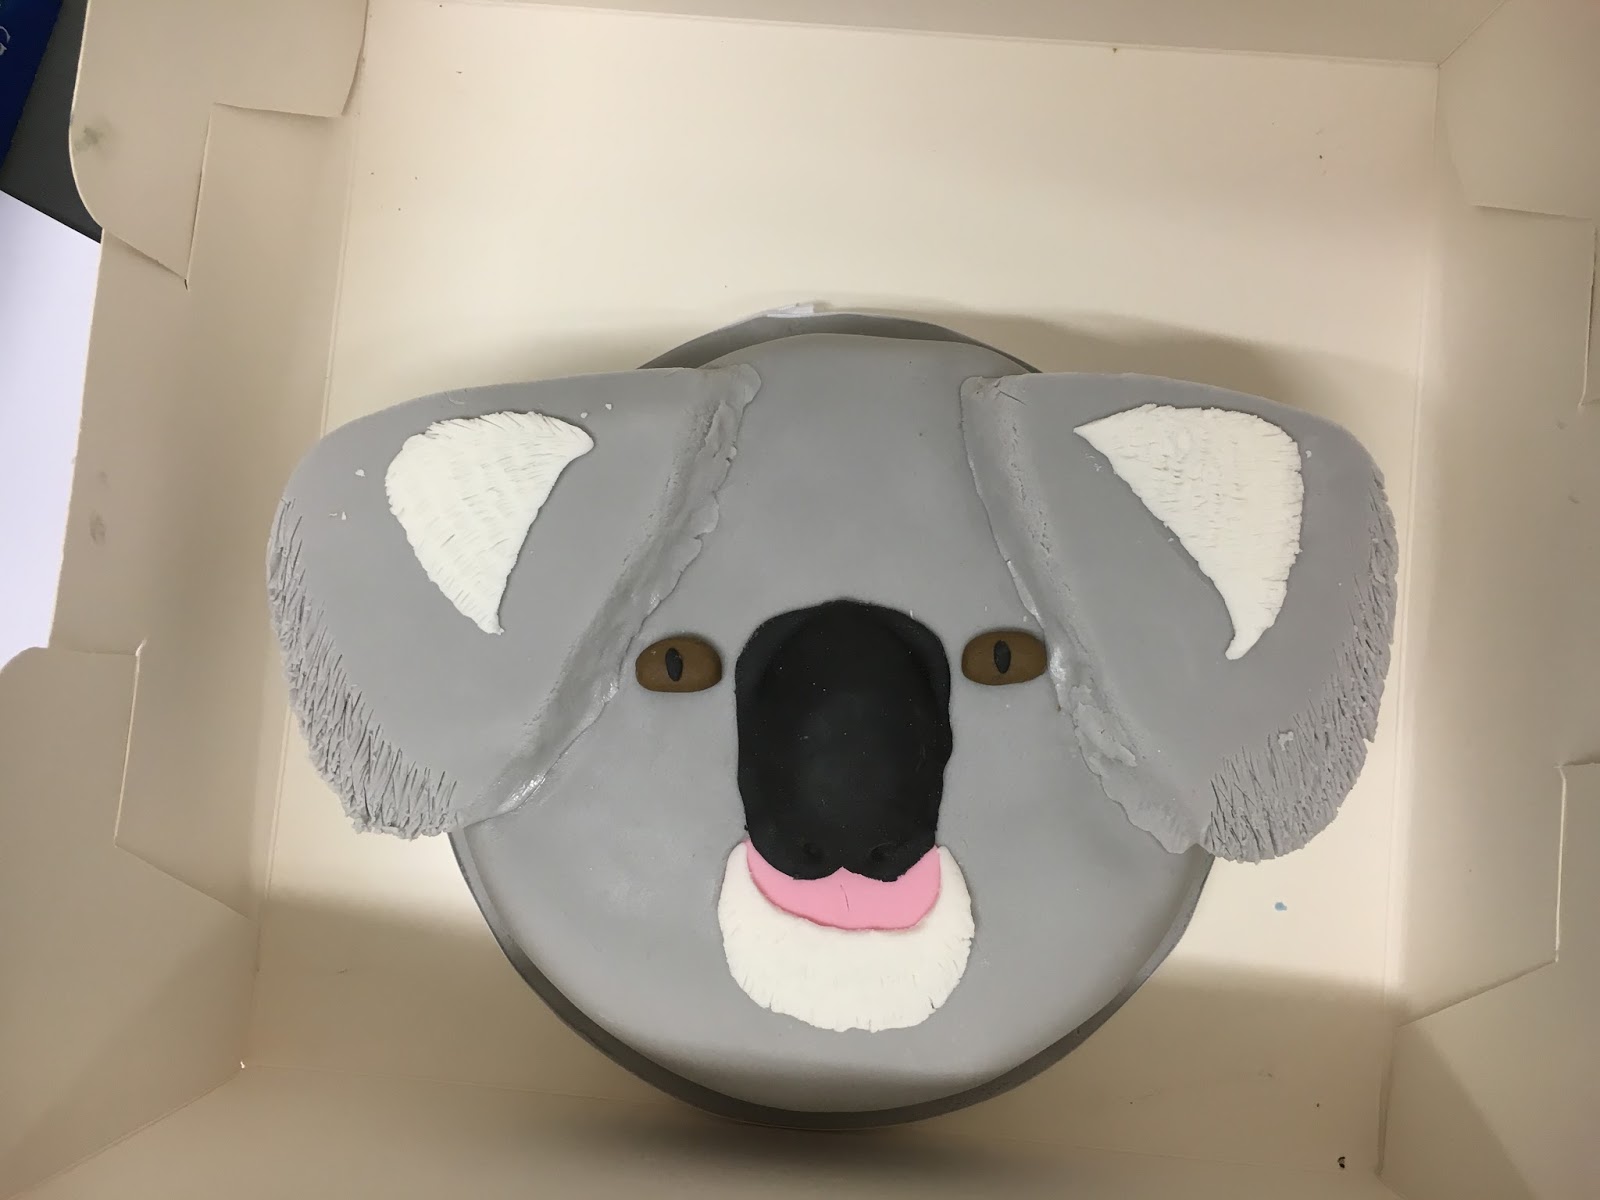
A koala cake for my Australia-dwelling big sister. The ears had to be supported from underneath with dowels as they were too heavy and kept falling off!

A friend asked me to make a monster-themed birthday cake for her son. I love having free reign to come up with my own design and I was really happy with this, especially the creepy hand at the back!

Another request from a friend. This didn't quite look like the design she asked for, I think the piping needed to be much more delicate. Smaller nozzle and steadier hand next time!

I did this one for my own birthday (saddo!) where the party was on Bonfire Night, so at least I had a theme to work with! The bonfire effect on the bottom tier was done with my airbrush and is the first time I've tried to achieve an effect that wasn't solid colour. I was quite please with the overall result.

Individual Christmas cakes!

Christmas 2014

A raffle prize for a local charity - Christmas 2015.

Christmas 2015 - as you can see I was big on the present theme that year!


Christmas 2016 - another go at a gingerbread house which was much more successful. Don't look at the back... I ran out of chocolate button slates...


A baby shower cake. I bought a silicon mould for the baby, it took several attempts to get it done properly but totally worth it!

I was asked to do a good luck cake for a few members of staff that were leaving. Apparently this wonky mess was all I could manage (embarrassing!!)


Another charity donation. It was a summer fayre raffle so I went for a holiday (Or vacation for any USA friends) theme! 

And finally, the most recent wedding cake I have been able to add to my list of achievements. Blue roses are very unusual (read: nonexistent) and I thought the overall effect was stunning. The bride was thrilled, which makes me very happy as I put my heart and soul into what I do. A wedding cake is one of the major features of the happy day and if you get it wrong the disappointment is so much bigger. I was very pleased to be able to contribute to her happy day :-D

Next time I make a cake I will try and remember to blog about it this time!!


Saturday 5 April 2014

Strawberry Cake

Well, I did promise a post about the strawberry cake which made the top tier of the recently-blogged-about wedding cake, so here goes. It probably won't be as exciting as everyone might have expected!

The idea of strawberry came in the first place as we were looking for ideas through my Primrose Bakery cupcake book. In there they have a recipe called Strawberries and Cream Cupcakes, which uses fresh strawberries in the cake mixture. I had to test the recipe first though, as it was for 12 muffin sized cupcakes, rather than to fit a 6 inch cake tin. So I tried, keeping the oven temperature the same but lengthening the cooking time to compensate for the much larger size. When the skewer finally came out clean, I removed it from the oven and let it cool (as you do), and then sliced it in half horizontally. The middle showed itself to be dense, stodgy and slightly soggy, while the outside was almost (but not quite) burnt.

Great.

Back to the drawing board then.

I did some research and discovered that there is more to cake flavouring than just vanilla extract. You can buy all sorts of flavourings, lemon, orange, coconut and many more, including strawberry! So off I toddled to Amazon and got myself some strawberry flavouring. I was a little dubious about the idea at first but once I tried it out my doubts left me as the cake did actually taste of strawberry! It was quite subtle though and I didn't want to overdo the flavouring so I needed something else.

For cake test number 3, I used a few more drops of the strawberry flavouring in the cake mixture than last time, then turned to the buttercream to add an extra strawberry hit. I took around 7 large fresh strawberries and crushed them until they were completely pulped, then added those to the made up buttercream which also had vanilla extract added. It seemed to curdle at first but then came together after a good mix. I had to add a lot of icing sugar to soak up the extra liquid and made up my mind that on the final cake I would drain the juice from the strawberries before adding to the buttercream! (Can't believe I hadn't already thought of that... duh.)

So for anyone who may be interested in making a 6 inch strawberry cake, here is the final recipe I used:

Cake:
225g Caster Sugar
225g Self Raising Flour
180g Corn Oil
4 Large Eggs
2 tsp Strawberry flavouring

Preheat oven to 160 degrees (fan) and line your tin.
Beat the eggs and sugar together until very thick and pale. This took me several minutes with my stand mixer.
Add the oil and strawberry flavouring and continue beating.
Add the eggs and a spoonful of flour one at a time, beating between each egg.
Add the rest of the flour and slowly mix until incorporated.
Cook for 1 hour 15 mins or until a skewer inserted into the centre comes out clean.

Buttercream:
100g Butter
200g Icing Sugar
1 tsp Vanilla Extract
Approx 7 large fresh strawberries, hulled and crushed with the juice strained off (you can use more or less than this)

Cream the butter and then add the icing sugar slowly whilst mixing until all the icing sugar is incorporated. Add the vanilla and mix on high speed until the buttercream is pale and has a mousse-like consistency.
Add the strawberries and mix until incorporated.

This should be enough buttercream to fill and crumb coat a 6 inch cake, assuming you are slicing into 3 layers.

I also recommend using a good quality strawberry jam in the filling as well.

Enjoy!


Sunday 23 March 2014

Wedding cake... Again!

So this weekend has been the grand finale of several weeks of baking practice, burnt fingers and absolute anguish at the idea of letting a good friend down. 

When said friend asked me months ago to make her wedding cake for her I was still filled with confidence from the last success (see my previous wedding cake post) and so I readily agreed. She wanted the same cascading roses design as my last cake but with a burgundy and ivory colour scheme. 

The three tiers were to be 10, 8 and 6 inches. Plain sponge on the bottom, chocolate in the middle and fruit cake on the top. However I wasn't happy with the idea of trying to get two sponges to take the weight of a heavy fruit cake, even with dowelling, so we agreed that the top tier would be strawberry sponge cake. 

For the last several weeks I have been sending my other half to work with boxes of various flavours of cake which have been my practice runs of each recipe. The one which gave me the most stress was the strawberry cake. So much so that I will give it a blog post of its own, I think!

I have also been practising roses again. At first I used the five petal cutter which I used for the roses on the first cake I did. But this created flowers which were not only too small, but which didn't even look like roses! The same happened with the single petal cutters I had. At this point I was tearing my hair out, convinced I was going to let my friend down with a terrible cake with terrible flowers. 

So I turned to my favourite online cakey shop, The Craft Company. I cannot recommend this shop enough for cake decorating equipment. They have always had everything I needed for decorating and deliver it well packaged and in good time. (Ok I'm done advertising now, they didn't ask me to do that lol).  I was able to get some large 5-petal cutters which were shaped more like rose petals than the standard cutters, as they have a point in the centre of each petal which allows for curling it back more realistically. These were the answer to my prayers and I spent two weeks' worth of evenings rolling, cutting and sticking to create 22 of these in ivory and burgundy:


One thing I've definitely learnt from this experience is that it is infinitely better to use polystyrene cones for the centre of larger roses rather than making them out of flower paste. It makes them that much lighter and therefore made me slightly less terrified that they were going to fall off the cake on its journey to the venue. 

Now, the first wedding cake I made was fruit cake. This is much easier to cover with fondant smoothly as you can use the marzipan layer to hide any flaws in the surface of the cake, then the fondant will go on smooth and level. Throughout all my practice runs I gained this knowledge about covering sponge cakes so they are smooth and level. 

1. Taking your time, cut the dome off the top of the cake, making a guide line all the way around the cake with your knife before cutting through it so you can be sure it is level. Use a tape measure or ruler if you need to. Then turn the cake upside down so that the flat base becomes the top of the cake. 

2. If you are slicing the cake to fill with buttercream, draw a line vertically down the side of the cake with a knife so that when you put the layers back together you can line it up correctly, with this as a guide. 

3. After crumb coating the cake, put it in the fridge for the buttercream to set. Then add another layer of buttercream and use it to create a smooth surface for your icing to sit on. Set this in the fridge too. 

4. Make sure your fondant isn't rolled too thinly. If it is too thin then it will fall into all the cracks and crevices that there will no doubt be in the sponge, and show them up. Thin fondant will also rip more easily and give you more problems to fix. 

So as you can tell, this was a very steep learning curve for me. After delivering the cake yesterday (next time you are stuck behind a slow driver, just think... They might be delivering a wedding cake!) I spent the day a nervous wreck, worrying what the bride would think and if it had met her expectations. I was also (slightly irrationally I suppose, given that the venue is popular for weddings, so they know what they are doing) worried that the venue wouldn't treat the cake with the delicate handling it required and I'd arrive to the evening reception to be told that they had smashed the flowers. But of course my worries were completely unnecessary. The bride told me immediately upon seeing me that it was amazing, and apparently people were touching the flowers just to see if they were real. (I was gobsmacked by this as I hadn't believed they were quite that good!) I had a few compliments throughout the evening and the experience has left me filled with confidence. One day I could perhaps make a living out of this, you never know. I'd have to change my name though. I don't think people would be willing to buy from someone who called themselves a novice!

       Congratulations Kirsty and Andy!


Wednesday 19 February 2014

More Dairy Free Cake

In my experiments with dairy free* baking, I have created this simple recipe which I thought I'd share with the world. It is for a six inch round sponge cake which could be used as a top tier for a wedding cake, for example. 

Ingredients:
225g caster sugar
4 large eggs
180g corn oil (please note this is grams not mls)
1 tsp vanilla extract
225g self raising flour
1/2 tsp baking powder

Method:

1: Beat the eggs and sugar together for several minutes until thick and frothy. 
2: Add the oil and vanilla extract and beat further. 
3: Sift in the flour and baking powder and fold in gently. 
4: Pour the mixture into a greased and lined 6 inch tin, and bake in an oven preheated to 180 degrees C (160 fan) for 1 hour 20 minutes. 

You can fill the cake with jam and a buttercream made with soya or other dairy-free margarine (see my previous post). 

I hope this recipe works for you; it did for me! :-)

*By dairy free I mean it is a recipe without milk in any form. This recipe does contain eggs which some people refer to as a dairy product. 

Sunday 9 February 2014

Babycakes! An adventure in dairy free baking.


My youngest has been diagnosed with an allergy to cows milk, which is fairly common but has made the already challenging journey of parenthood even more so. It also means that he hasn't been able to taste any of my baking apart from my bread, as pretty much everything contains butter when it comes to baking. 

But I have recently been introduced to soya margarine, which has opened up new doors in dairy free baking. So I thought I'd try out a dairy free cake, complete with buttercream (or is it margarine cream) and fondant icing. 

Here is the recipe I used. It's pretty similar to your usual sponge recipe, except replacing the butter with margarine:

Cake:
Using two 20cm (at its widest point) heart shaped tins
225g caster sugar
225g soya margarine (we used the Pure brand)
225g self raising flour
1/2 tsp baking powder (possibly unnecessary with self raising flour already there but I was playing it safe)
2 large eggs
1 tsp vanilla extract
Strawberry jam to fill

Buttercream:
275g soya margarine
375g icing sugar
A few drops of vanilla extract

To decorate:
500g fondant icing
Food colouring of choice

I used the creaming method with the margarine and sugar, then beat in the eggs and vanilla extract. The flour and baking powder were then folded in and the mixture was split between the two cake tins and baked at 180 degrees (fan) for 25 minutes. 

The cake itself was delicious and it has still not gone stale a week later. I'm not sure if this is to do with the margarine or the airtight quality of the box I am keeping it in though!

The buttercream was also pretty tasty, although its qualities were different to if it had been made with butter. As margarine is meant to be spreadable it didn't set when I had crumb coated the cake (this is how I have learnt is the easiest way to cover a sponge cake in icing: cover the cake in a thin layer of buttercream to seal in the crumbs, then put the cake in the fridge for the buttercream to set. Then add another layer of buttercream and use this to flatten the top of the cake and create sharper edges. Let this set in the fridge again and then cover with fondant) so I had to put it in the freezer. Even then it didn't set completely. So the sides of the cake looked very messy as I hadn't been able to get completely straight edges. I have yet to discover a way around this. If anyone has any ideas, feel free to comment!

As for my decorations, I was visiting my best friends for the day and I decided to model the cake on their babies who are the same age as mine. I need to practise bodies again I think!


Monday 19 August 2013

Treacle Tart

I'm back! Sorry about the silence, there has been a new addition to the family and having a toddler and a newborn has kept me so busy I haven't had the time for baking! Littlest one is just starting to entertain himself for a few minutes at a time these days and is napping a little longer too, so I'm starting to get on top of things again.

I've been watching re-runs of The Great British Bake Off over the weekend and I was inspired to try out a tart since I have had a lovely new tart tin sitting in the cupboard for a few months now. I've seen a few programs where James Martin (I do rather like James Martin :) ) makes treacle tart and it seemed simple enough so I thought I'd give it a go.

The most time consuming part was actually the pastry. I had to make it, chill it, then blind bake it before adding the filling. Moulding it into the tin was quite difficult as the recipe I used included flour, butter and an egg which made quite a dry, crumbly pastry. Rolling it out was a complete waste of time as it just tore so I just stuck the whole lot in the tin and pushed it out to the edges making sure it was nice and thin and even. After 30 minutes of chilling it went into the oven until it was just brown, and then I added the filling, which consisted of an entire tin of golden syrup (!!!), bread crumbs and lemon rind/juice. It really is a simple recipe so if you buy ready made pastry it's one you can do very quickly. Interestingly, there is no treacle in a treacle tart recipe!

Half an hour of baking later and this is what I ended up with:

Fresh out the oven

Cooled and removed from the tin

Served with a big dollop of whipped double cream

For the record, it was delicious! I was expecting it to be incredibly sweet, given how much syrup went in there, but the lemon cut through it nicely.

Don't forget to like my Facebook page here!